Split DNS when 53/udp is in use

Say that you’re doing a pentest/RT with one end of a device connected to 4G dongle and the other end connected to the target network via ethernet. In such cases you want the box to fetch updates via 4G and only use the ethernet for the security test. Split DNS tunneling is a solution. However, sometimes you may already have a process bound to port 53/udp that you don’t want to kill (e.g. a C&C server such as CS / MSF). Unfortunately /etc/resolv.conf does not allow you to specify a port on Linux (as far as I’m aware).

The following settings allow you to run dnsmasq on a different port but still work for a local resolver.

Dnsmasq step:

## vim /etc/dnsmasq.conf:

# Set the alternative port
port=5353

# Ignore /etc/resolv.conf
no-resolv

# Upstream DNS for normal traffic
server=192.168.1.1

# Upstream DNS to resolve domain names for the security test
server=/clientnetwork.local/10.0.0.1

Local DNS resolver step:

## vim /etc/resolv.conf:

# Dummy nameserver. Will not be actually queried
nameserver 192.0.2.3

Iptables step:

# Redirect the DNS queries towards the dummy server
# to go to the local dnsmasq instead
iptables -t nat -I OUTPUT --dst 192.0.2.3 \
-p udp --dport 53 -j DNAT --to 127.0.0.1:5353

PowerShell script to suspend Windows screensaver at specific locations

Say that you are working with two laptops side by side. You may not like the automatic screensaver kicking in on a laptop while you are momentarily working on the other, in particular if it requires a password to unlock. This may be especially true at certain locations that are trusted (e.g. home).

The following PowerShell script for Windows can be used for suspending the screensaver when you are connected to a specific Wi-Fi network.

$wsh = New-Object -ComObject WScript.Shell
# Idea to use WSH comes from: https://stackoverflow.com/questions/9794893/powershell-toggle-num-lock-on-and-off

while ($true) {
  $wifi = get-netconnectionprofile | Out-String -Stream | Select-String -Pattern ""
  if ($wifi) {
    $wsh.SendKeys('+')
  }
  Start-Sleep -Seconds 60
}

C2750D4I RMA in NL

I bought an ASRock C2750D4I motherboard for my NAS in October 2014. In March 2017, my board was struck by a firmware bug that involves the BMC flash storage being worn out too quickly because of a bug in the watchdog. This is a well-known issue.

Since my board died after more than two years, I was worried whether I could still get it RMA’ed. The shop where I bought the board stated I only had two years warranty.

Luckily, the folks at ASRock were very helpful. I discovered that (also) in The Netherlands you have three years warranty on the C2750D4I.

I received a replacement board from ASRock quickly. As of now, half a year later, the new board is still operating perfectly. I can only say that my RMA experience with ASRock has been positive.

Update 2022: my board died again, this time because of the C2000 bug. ASRock was very considerate in sending me a new board, this many years after I bought it.

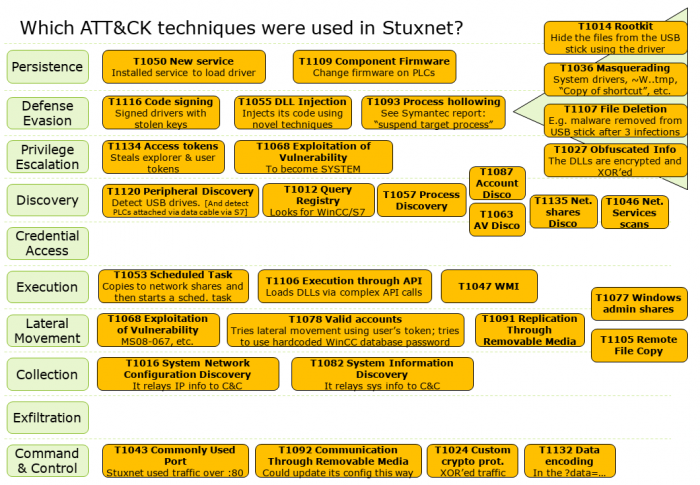
Mapping Stuxnet on the ATT&CK framework

The MITRE ATT&CK framework is a great tool for blue teams.

As an exercise, I tried mapping the Stuxnet attack onto the ATT&CK framework. As a source, I used the excellent Symantec Stuxnet paper.


CC-BY-SA.

  • I tried cramming it all into one slide, sorry for that. Defense evasion is indeed that big.
  • There are multiple ways to do the mapping. There could also be mistakes (caveat emptor). I welcome any bugfixes.
  • The credential access row is empty, since from what I read it used the user’s credential token not their actual passwords. The exfiltration row is empty because the paper shows that this instance was primarily meant for infecting the SCADA systems. Of course, the malware was able (via its C&C connection) to have exfiltration modules, but these were not discussed.

PDF version: ATT&CK – Stuxnet.

Cleaning up broken snapshots (snapper + btrfs)

The combination of btrfs + snapper is a great solution for the Linux desktop. Perhaps even the best thing since sliced bread. Once properly set-up, you can rollback any file that you may accidentally damage at some point. I’ve found it invaluable during software upgrades/migrations (oops, are all your desktop panels gone after upgrading? don’t worry, just roll back) or when running into bugs (oops, the Digikam library got corrupted? don’t worry, just roll back).

Configuring snapper involves letting systemd activate it regularly using systemd timers. This works well, although you may end up having corrupt / incomplete snapshots if your computer crashes in the middle of a snapper operation.

Having broken snapshots will be made known to you in the journal with events such as:
:1: parser error : Document is empty

This message indicates that you have work to do to clean up broken snapshots. The following Bash oneliner may help you do this:

IFS=$'\n';
for x in $(grep -hr SUBVOLUME /etc/snapper/configs | cut -d '"' -f 2); do
  for y in "$x/.snapshots/"*; do
    z="$y/info.xml";
    if ! [ -s "$z" ]; then echo "***$y***"; ls -lah "$y";
      read -p "Delete? (y/n)" R; if ! [ "$R" = "y" ]; then continue; fi;
      set -x; btrfs subvol del "$y/snapshot"; rm -rf "$y"; set +x;
fi; done; done; unset IFS
  • I’ve broken the oneliner over multiple lines for this post, but just merge them together for use in a shell.
  • This is just a oneliner and not a real program. The way I do it here, is not the recommended way to loop in Bash though it should work fine for this use case (the alternative, using read + while, won’t work here due to a nested read). Refactoring would make it more complex, at which point I’d suggest to just make it a Python program.
  • It needs to run as root.
  • As always, have back-ups. Caveat emptor.