TikZ node positioning

Drawing nodes in TikZ above each other can be tricky. For example, if you want to draw several nodes above another node in an aligned way.

One way to achieve this is as follows.

\node[minimum width=5cm] (basis) {};
\node[above=of basis.north west, anchor=south west] (a) {A};
\node[above=of basis] (b) {B};
\node[above=of basis.north east, anchor=south east] (c) {C};

nodepos

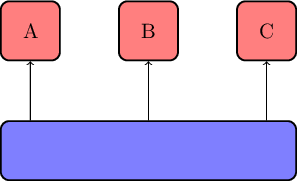
In this way, the left border of A and the right border of B do not extend beyond the basis node. Note that you need to have the positioning TikZ libary loaded.

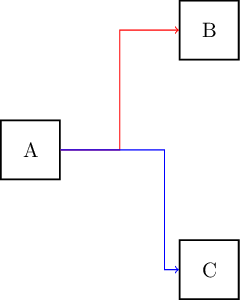
To draw the edges in a vertical fashion, use the intersection shorthand for the nonstandard nodes:

\draw[->] (basis.north -| a) -- (a);
\draw[->] (basis) -- (b);
\draw[->] (basis.north -| c) -- (c);

TikZ node connector

In the series of TikZ tips, today we look at connectors between nodes.

TikZ comes with a variety of line types between nodes, such as straight, curved, and right-angled. In particular the last one, right-angled lines, can be very useful in diagrams. Right-angled lines are usually more appealing than direct point-to-point straight lines in diagrams.

Placing right-angled lines in diagrams in a visually appealing way is not always easy, however. Consider for example this diagram in which a chain of nodes have an outgoing arrow into an array.

connector needed

In this figure, the line marked B is well-suited for a right-angled line. On the other hand, the line marked with A is less-suited, since it needs two bends. For the ease of use, try using the following two macros for horizontal or vertical lines.

\newcommand*{\connectorH}[4][]{
  \draw[#1] (#3) -| ($(#3) !#2! (#4)$) |- (#4);
}
\newcommand*{\connectorV}[4][]{
  \draw[#1] (#3) |- ($(#3) !#2! (#4)$) -| (#4);
}

You can then use macros by specifying a value between 0 and 1 (where to ‘break’) and the source and destination node. For instance

\connectorH[->, red]{0.50}{a}{b}
\connectorH[->, blue]{0.75}{a}{c}

Results in:

connector

Note that you need to have the calc TikZ libary loaded.

Disabling Office 2010 shared folder synchronization in a simple way

There are various posts on how to remove the Office 2010 “Shared Folder Synchronization” context menu using either the Windows registry modifications or the Office uninstaller. I prefer a cleaner solution which seems hard to find at Google, so it’s worthwhile mentioning it here.

Steps

The approach is to unload the DLL in question. The first step is to start a command prompt as administrator.

In this command prompt, type (assuming 64-bits Office — see comments for details):

regsvr32 /u "C:\Program Files\Microsoft Office\Office14\GROOVEEX.DLL"

Pasting is not good enough, since the command prompt will not swallow the quotes. Therefore, type it, or repair the line with the up-arrow after pasting. An example of how it looks like:

After executing the command, a dialog will inform you of the result. If you get an error, double check whether you opened the command prompt as administrator correctly.

Reloading

Reloading can always be done by calling regsvr32 as shown above, but without the /u flag.

(Aside: in Office 2007 this feature was called Groove folder synchronization.)

Multi-hop X-forwarding over SSH

Sometimes you’d like to do X-forwarding over multiple hops. For instance:

Home ↔ Office gateway ↔ Office machine.

One way to automate this is with this Bash function:

sshx () {
        [ -z "$2" ] && return
        sudo ssh -Nn $1 -L 2200:$2:22 &
        sleep 1s
        PID=$!
        ssh localhost -XYC -p2200
        sudo kill $PID
}

Choose a random localhost port number; 2200 is merely an example here.

Then invoke with:

$ sshx passthrough_server destination_server

Since the snippet relies on Bash forking, it assumes you have set up SSH for public key based authentication with the passthrough server, and it will not ask for a password. Because SSH requires root privileges on your local machine to set up the port forwarding, your ~/.ssh/authorized_keys on the passthrough server must contains the public key of root from your local machine.

Price variances in European train tickets

When travelling internationally in Europe by train, it pays off to consider with which railroad operator you book your ticket.

This post is about price differences between Deutsche Bahn and NS Hispeed.

Use case

For the the same ticket, more than a month in advance, both DB and NS were compared.

DB

NS Hispeed

Findings

Even though one would be travelling with exactly the same trains, there is a €53 price difference between the operators. In other words, a DB traveller could save 62% by booking via the NS for this particular trip.

(Screenshots date: 29 July — tickets date: 3 September — tickets type: 1 adult, no reduction, second class from Venlo (NL) to Darmstadt (D).)